_edited.png)
O4I: A Full Boomerang Example
- Joel from Arkansas

- Jul 11, 2024
- 5 min read
Introduction

In this blog post, we will explore the functionality of Orchestration for Integrations (O4I), the newest addition to Workday’s integration development toolset. If you aren’t familiar with O4I, check out our previous blog post on the topic.
We will walk through a “boomerang” integration which will extract data from Workday, process it and then update Workday using the manipulated data.
This orchestration will extract a list of workers who have completed a specific learning course and will load a user-based security group (UBSG) with this population of workers.
In this blog post, we will focus on using a RaaS report (a report has been enabled for web services) as our data extraction method.
In a subsequent blog, we will examine how to get the same results using Workday Query Language (WQL).
The graphic to the right shows the orchestration inside the Orchestration Builder. We will focus on the right side of the graphic under the Else side of the branch.
A Custom Report
First, we need to build a custom report. Layout and sample data can be found below:

In order to use the RaaS report in an Orchestration, we will need the URL of the report. To find this link, select related options from the custom report, then Web Service and then View URLs:

On the next page, right click on the link next to the JSON data output format you will be using and click Copy URL:
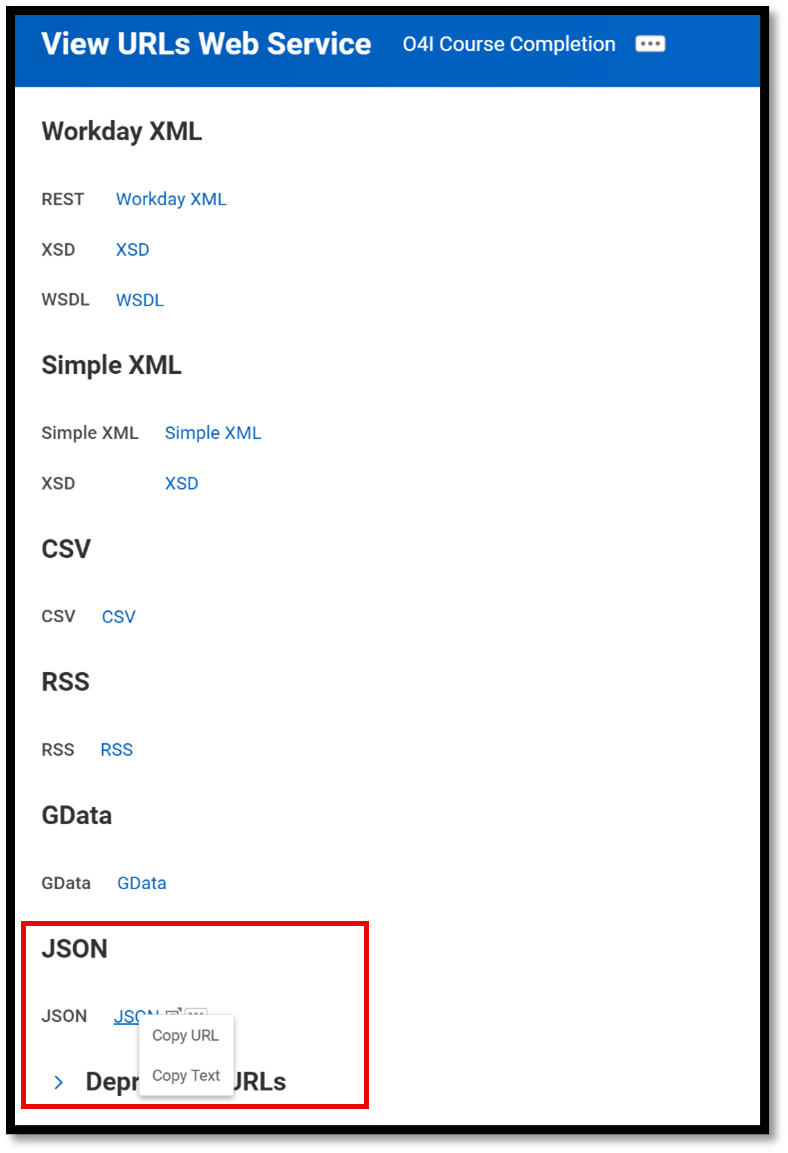
In the example above, our URL is as follows:

In the first step of our orchestration, we will use the Send Workday RaaS Request node to configure our connection to our report.

When we click on the node, we can set parameters.
Notice the URL near the top of the form. This is where we direct the request to the correct report.
The URL that we retrieved in the previous step will assist us in this configuration.
Specifically, let’s focus on this part of the URL:

The format of the URL for the web service call should begin with the report owner. In Production, most likely this would be an integration system user (ISU), but for testing, we are using Logan McNeil in our GMS Dev tenant, therefore we will use lmcneil for the first parameter. We will then add a slash and then add our report name. In this example, we will use O4I_Course_Completion which we can also pull from our URL. Do not include any of the data after the report name (starting with “?”). We will use that information in the next step.

Click on the Query Parameters tab and this is where we will enter any of the additional query string parameters (data after the “?” in the original URL). In this case, the only parameter is format, which refers to the format of the data that we want returned. In our case, this will be JSON. In other cases, there may be multiple parameters if you are setting multiple prompt values as part of your call.


We will add a Log node so that we can write data to the application log for debugging or informational purposes.
Notice the ***O4IDEBUG*** string in the message. This is used as an eye catcher and a unique search term for easier access to log message:

A Loop Node

The next step in our Orchestration is to iterate through each row of report data. To do this, we add a Loop node and configure it to read our data.

In the loop node, there are a few required fields. The Reference Name value is an internal name that we can use to reference data elements from this node in future nodes.
We need to set the Data Type to JSON Iterator because the data we are processing is in JSON format.
The Data Set value refers to the data through which we will iterating.
Notice that we can reference the response from our previous step.
Although we will use JSON in this example, we could have output the data as XML and processed it instead. See below for a comparison of the two types of output formats below (JSON on left and XML on right):


For our use case, we want to create a list of all Workday UserIDs included in our file. To do this, we configure an aggregation by selecting Configure Aggregation at the bottom of our loop group.
We will name our list WorkerList and since this will be a list of strings, we will use the String List strategy. As the String value, we will use the WorkdayUserID that we extracted in our CreateValuesRaaS step inside the loop (explained in next section).
The CreateValuesRaaS node is included in our loop. In this node we will extract the data elements from our data set. Since we are only interested in extracting the WorkdayUserID from our dataset, we have only one item as part of our Key/Value Pairs section. We use the stringAtJsonPath function to direct the orchestration where to find the element in the data set:


Once we have iterated through all elements in our data set, we are ready to build our request to send back to Workday to populate the user-based security group.
We will use the Create Text Template node to build the SOAP request.

The content type should be set to text/xml since we are building a SOAP request.
Notice the sections of code inside the red boxes in the Message section.
This notation is called templating language and allows us to reference data from previous steps to inject dynamic data into the static text surrounding it.
A Web Service

The next step in the flow is to call a web service to populate our user-based security group (UBSG).

When calling a SOAP API, we need to make sure our method is set to POST. We add the web service URL to the end of the URL provided.
In the Select Data field, we will use the message that we created in the CreateSOAPRequestRaaS step and we will use the wrapSoapV11 function to format the text to include the correct XML tags expected by the web service.
Content Type should be set to text/xml since this is request is for a SOAP web service.

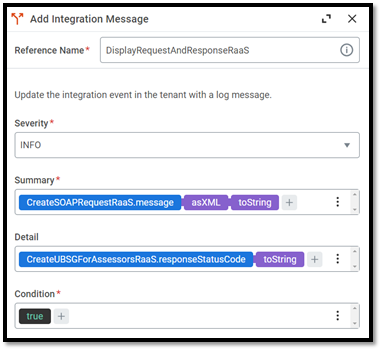
Next, we will add an Add Integration Message node to display our request and response from the previous step as an integration message.
This step isn’t required but does allow us to write the message to our integration system output for viewing.
Conclusion
In this blog post, we demonstrated how a boomerang integration pattern can be achieved using Orchestration for Integrations (O4I). The next blog post in our series will show how to use WQL instead of RaaS as our initial data source.
Sources:
Author: Joel from Arkansas


O4I seems pretty slick. But what I can't find anywhere is a learning path on how I can upskill myself on integration protocols so that I could actually try using this stuff. Great that a tool can make like easier for those who already are integration specialists. But how can those of us who want to start dipping our tow into this domain learn the fundamentals so that we could utilize O4I as well?